
As part of the indigenous public authoring / TEK (traditional environmental & cultural knowledge) project I am working on with anthropologist James Leach in Papua New Guinea we have created a simple 1 page poster of folding instructions for making up bookleteer/diffusion books in English and Tok Pisin. Thanks to Porer Nombo and Rembi Yemui of Reite village, Rai Coast, who helped with the description, translation and localised spelling.
Download it here (A4 670Kb)
Tag: guides
Categories
Page Planners


We have created an additional resource to help plan layouts and work out how many pages you need when devising your content for bookleteer. Two PDF documents are available, one for planning landscape books and another for portrait books.
Download the Landscape Planner or the Portrait Planner.

During our recent pop up publishing workshops I was able to observe that one of the most common tricky aspects of using bookleteer for new members was remembering the steps for setting up a new document to create the ‘Content PDF’ to upload. I’ve now put together a very simple crib sheet for users to download to remind them how.
Click here to download it as a PDF.
Recently, we’ve discovered a very, very simple way of making your own cardboard, hard-wearing StoryCubes, using only:
- A free bookleteer account
If you haven’t signed up for a free bookleteer account yet, do so here.
- A4 single label paper, suitable for Inkjet or Laserjet printers
Full sheet label paper, available from any decent stationers (Avery code: DSP01).
- Blank StoryCubes
Read about StoryCubes, and order blank packs here.
Firstly, design your StoryCube.
Sign into bookleteer. If you’re a new user, read the help page.
Design your cube using the bookleteer templates, export the file as a PDF, then upload to the Create A StoryCube page, or upload each image individually.
Select Generate StoryCube and download the file, from the top right corner of the screen.
Next, print and make.
Print using the label paper, and cut around around only the faces of the cube, not the tabs – it should look a crucifix (You can also protect your cube by using adhesive cellophane, by affixing a layer on top of the label sheet, then cutting out).
 Peel off the backing paper, and stick onto a blank cube.
 Fold your StoryCube, and voila!

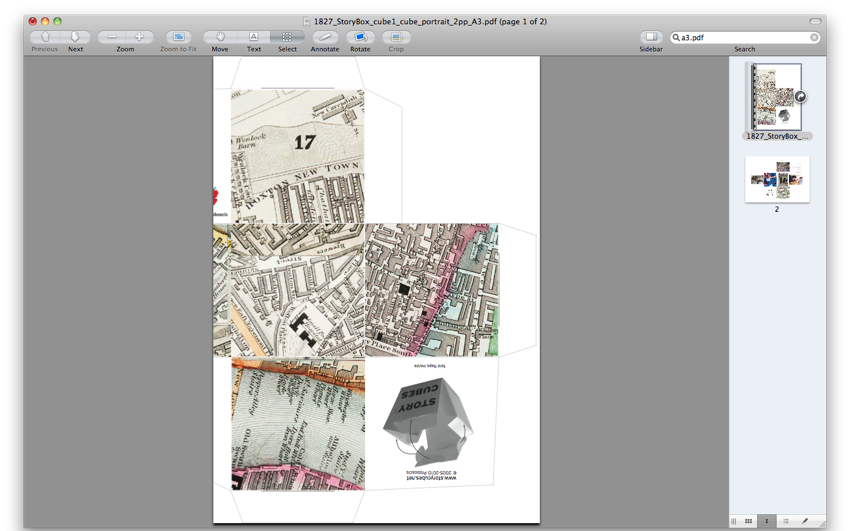
You can even use this method to make your own A3 size StoryCubes, without even owning an A3 printer.
Simply crop the A3 cube PDF into two documents, so that it can be printed across two sheets of A4 paper.


Then, cut out the two segments as shown, to form a two-part crucifix shape.
 Stick onto to a blank A3 cube and fold…

 … and you now have an A3 cube, using a standard home printer.
If any bookleteers discover more clever ways to make StoryCubes, do share!
Categories
Updated help page
We’ve updated the help page to reflect questions arising from the new features and services we introduced last week. Please refer to it for information on the differences between designs, page sizes, image dimensions and ordering. Do please give us feedback (via this blog, our twitter account or by email) if you have further questions or queries.
Categories
Guide to new features
What Design Should I Choose?
Proboscis have created 2 different eBook designs which you can choose from, both of which are available for A4/US and A3/Ledger sizes.
Basic is a simple book design which places the title, author, a cover image and a logo image on the front cover. The eBook title, author, credits and secondary logo are placed on the back cover.
Custom Cover allows users to design their own front cover and upload it as a JPG image. The eBook title, author, credits and both logo images are placed on the back cover.
What are the page dimension for the different sizes?
– A4/US Letter eBook Portrait : 88mm by 133mm
– A4/US Letter eBook Landscape : 133mm by 88mm
– A4 StoryCube : 55mm by 55mm
*
– A3/Ledger eBook Portrait : 130mm by 193mm
– A3/Ledger eBook Landscape : 193mm by 130mm
– A3 StoryCube : 82mm by 82mm
Where can I download the content templates?
Proboscis have created some simple empty page templates for MS Word, OpenOffice and Adobe InDesign which can be downloaded here.
What dimensions should my cover image be?
Images should be saved as JPGs or PNGs at a minimum resolution of 72dpi at exact size or greater. For best results 150dpi is recommended.
Basic Design
– A4/US Letter eBook Portrait : 65mm by 90mm
– A4/US Letter eBook Landscape : 90mm by 65mm
– A3/Ledger eBook Portrait : 90mm by 135mm
– A3/Ledger eBook Landscape : 135mm by 90mm
Custom Cover Designs
– A4/US Letter eBook Portrait : 88mm by 133mm
– A4/US Letter eBook Landscape : 133mm by 88mm
– A3/Ledger eBook Portrait : 130mm by 193mm
– A3/Ledger eBook Landscape : 193mm by 130mm
What can I use the Logo images for?
The ‘Logo’ spaces allow users to add one or more logos to the covers of their eBooks. The Main Logo could, for instance, be the logo of the ‘publisher’ or author and the Secondary Logo might be used for credits, such as acknowledging sponsors/funders or for placing a Creative Commons-type image. However, they can also be used just as spaces for images on the front/back covers.
What happens when I order some POD eBooks or StoryCubes?
When you confirm your order an email is sent to Proboscis where one of us will calculate the cost and send you an invoice via Paypal. Once we receive payment we will send your item(s) to press and aim to have the finished products in your hands within 7 working days. StoryCubes will be printed on a regular basis – check here or on twitter for details of the next printing deadline.
The ordering system is very hands-on whilst we’re still developing the alpha version of bookleteer – please bear with us and forgive its manual shortcomings!
We’ve recently posted some new videos demonstrating how to fold, cut and make up the 4 different types of Diffusion eBooks that can be made using bookleteer:
How to make: Book Landscape Diffusion eBook from Proboscis on Vimeo.
How to make: Book Portrait Diffusion eBook from Proboscis on Vimeo.
How to make: Classic Landscape Diffusion eBook from Proboscis on Vimeo.
How to make: Classic Portrait Diffusion eBook from Proboscis on Vimeo.